Beauty Retouch Panel
Interface & Buttons Explained
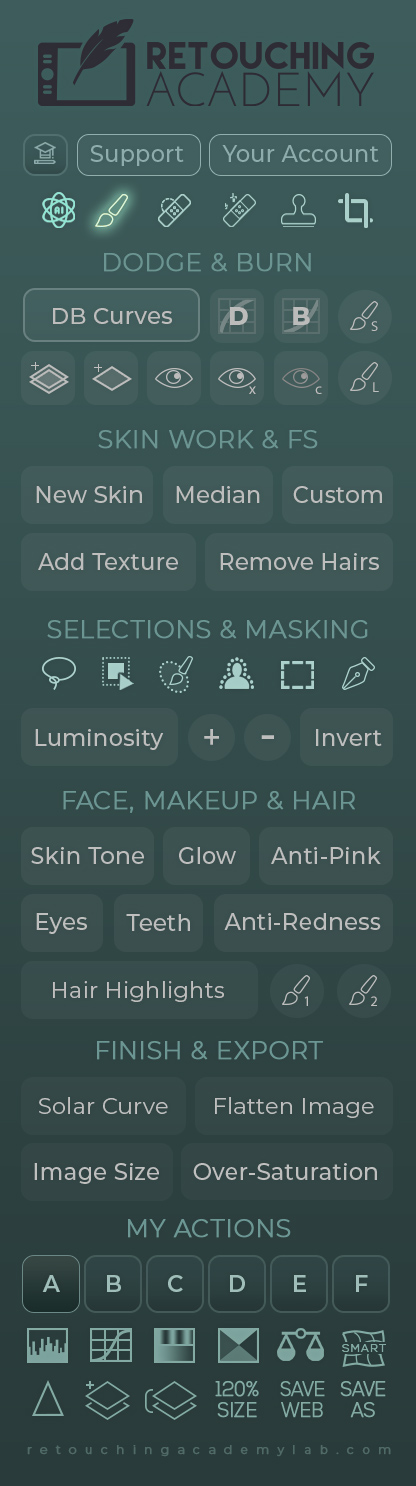
Beauty Retouch v5.0 Interface
In the latest version of the Beauty Retouch panel, we added a lot of new tools and great new retouching scripts. Please watch our detailed video tutorials. Click on the sections of the panel below to read about them; each numbered section maps to a group of buttons.
The buttons in the top row are the links to a few useful pages on our website:
- Video Tutorials page;
- Contact Support page;
- And your Member Account page.
The Tools Row of Buttons
In the new version of the Beauty Retouch panel, we've added a new row of tools that are commonly used in beauty and portrait retouching. These buttons will activate the following tools:
- Our custom AI Tool (learn more in this lesson);
- Brush Tool;
- Spot Healing Brush Tool;
- Remove Tool;
- Clone Stamp Tool;
- Crop Tool.
Dodge & Burn Section
Dodge & Burn is one of the key beauty and portrait retouching techniques. This section of the panel will save you time by setting up the necessary layers for multiple variations of this technique with just a click of a button. Developing a solid understanding of the technique is the first step toward mastering it. Our Skin Retouching and Master Dodge & Burn video courses are a great source if you are still learning.
The buttons and scripts in the upper row of this section will set up:
- DB Curves button — the full Curves D&B set up with the Visual Aid layer group at the top;
- D button — just a Dodge Curve;
- B button — just a Burn Curve;
- D&B Brush S (small) — the round button will activate the small custom D&B Brush (10px) (you must have activated the brush presets and custom brushes as described here).
The buttons and scripts in the bottom row of this section will set up:
- Gray Layers button — will create a set of D&B Gray Layers for your Dodging & Burning work on separate layers;
- Gray Layer button — just one Gray Layer for D&B work on the same layer (our preferred way of D&B);
- The Eye Icon button — the Visual Aid (VA) group of layers to help you see the luminosity inconsistencies when Dodging & Burning;
- The Eye x button with a small letter X (for "multiplied contrast") — the same VA group of layers as above, only with more contrast added for better visibility;
- The Eye c Icon button with a small letter C (for "color") — this VA group of layers is helpful to check the dispersion of colors in your image for your color correction work;
- D&B Brush L (large) — this button will activate the larger custom D&B Brush (300px).
Skin Work & Frequency Separation (FS)
The Frequency Separation technique is a great time-saver, but you must know how to use it correctly to produce professional, high-quality retouching results when using it. Our Skin Retouching and Professional Beauty Retouching video courses are a great source if you are still learning. The All-in-One Bundle includes both those courses and more.
The Skin Work & Frequency Separation (FS) buttons in the top row of this section are:
- Our New Skin script (learn more in this detailed tutorial);
- The Median button — the Frequency Separation (FS) setup via the Median Filter;
- The Custom button — the custom FS setup via High Pass and Gaussian Blur filters;
- Add Texture button (former Digital Skin Texture) — lets you restore or imitate skin texture in areas that look too smooth or lack detail;
- The Remove Hairs script (former Remove Body & Facial Hair) — works great for facial hairs or stubble under the brows. It is also very handy for cleaning up black spots or makeup specks on skin, hair-spray particles in hair, lint on clothing, and other small distractions that would otherwise take forever to remove one by one.
Selection Tools
The ability to make precise selections and masks is essential for professional retouching work — whether you're isolating details, refining edges, or applying targeted adjustments. This section gives you quick, one-click access to the most powerful selection tools in Photoshop today:
- The Lasso Tool;
- Object Selection Tool;
- Selection Brush;
- Select Subject feature;
- Rectangular Marquee Tool;
- Pen Tool.
Luminosity Selections
Luminosity-based masking is one of the most powerful tools in professional retouching. Layer Masks created based on Luminosity selections allow you to isolate and adjust specific tonal ranges in your image with exceptional precision.
This set of buttons gives you quick access to highly versatile selection controls for high-precision color grading and local corrections. Once you start using them, they're hard to work without because of how helpful they are.
The Luminosity Selections set of buttons:
- Luminosity selection button (former Basic);
- Plus button to expand the Luminosity-based selection;
- Minus button to subtract from the Luminosity-based selection;
- Invert button to invert the active selection. The Invert button works independently of the other buttons in this section; it will invert any selections regardless of which tools you used to make them.
Face, Makeup & Hair Retouching
Streamline common beauty and portrait retouching tasks with our scripts and custom brushes, refined over the years to deliver natural-looking results efficiently. For more details, refer to the Face, Makeup & Hair Retouching lesson of the BR training.
The Face, Makeup & Hair Retouching buttons:
- Skin Tone (former Magical Skin Tone) to correct and unify skin tones across an image;
- Glow button (former Glowing Skin) to enhance existing highlights on the skin;
- Anti-Pink button to minimize magentas in the skin tone, which is responsible for a less attractive appearance of the skin that might be intuitively connected with unhealthy inflammation;
- Eyes button (former Magic Eyes) to quickly clean up the eye whites and add vitality to the eyes;
- Teeth button (former Magic Smile) to brighten and whiten teeth in seconds;
- Anti-Redness button (the Green Color Corrector from the MUA Retouch panel) to remove redness in inflamed areas (rash, flared-up pimples, etc.);
- Hair Highlights script with two custom brushes to add beautiful highlights for a healthy and attractive hair appearance.
Finish & Export
Before submitting retouched images to your client or a magazine, use our Quality Control scripts to help you perform some of the crucial final checks.
The Quality Control buttons:
- The Solar Curve script helps ensure you haven't left any retouching footprint, sensor dust, or other unwanted artifacts on an otherwise cleaned-up background. It's especially useful for inspecting studio backgrounds with gradients and preparing images for print. Learn more here.
- Flatten Image — our go-to before exporting TIFF files for clients, as it removes all unnecessary layer and masking data from the file;
- The Image Size dialog is useful in many situations, and having quick access to it directly on the panel is a real time-saver;
- The Over-Saturation script helps you quickly spot any areas in your image that are overly saturated and need adjusting — especially important before final delivery to a client or printing. Learn more here.
My Actions
Add your own custom Actions and trigger them right from the panel's interface.
Learn more in the User Custom Actions lesson.Helpful Tools at the Bottom of the Panel
This section brings together some of the essential tools for finishing your retouching work: color and tonal adjustments, smart liquify reshaping, sharpening, and final export. With just one click, access everything you need to finalize and prepare your images for delivery or sharing.
The upper row of buttons will activate the following Adjustment Layers:
- Levels
- Curves
- Hue/Saturation
- Selective Color
- Color Balance
- Smart Liquify — the Liquify Filter added as a Smart Object so you can re-adjust your manipulations as many times as you need, unlike when using the regular Liquify Filter.
The bottom row of buttons will run the following scripts:
- The Sharpen Image will help you quickly add sharpening to the entire image or partially using the layer mask;
- Add a Blank Layer;
- Stamp All Visible Layers;
- Increase the size of your image canvas 120% for the best gradual enlargement results;
- Activate Save For Web dialog box;
- Activate Save As dialog box.
Proceed to the next topic to learn how to use each button and script of the panel.