
Beauty Retouch Panel Training01 · Panel Interface & Workflow OverviewPanel Interface & Buttons Explained
Beauty Retouch 6.0
Interface & Buttons Explained
Back to Beauty Retouch 6.0
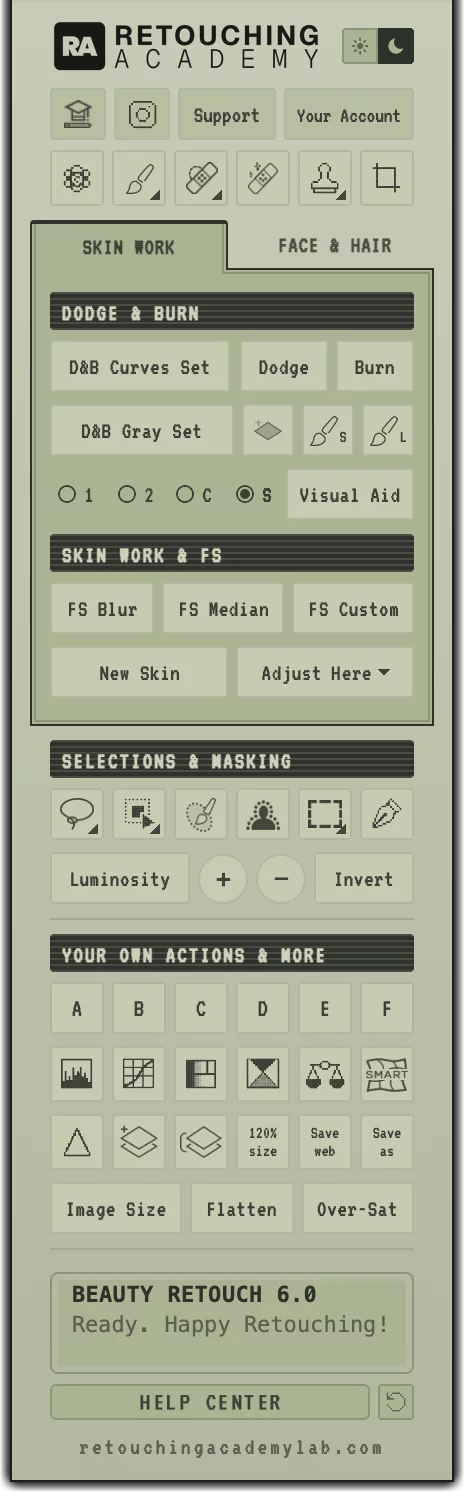
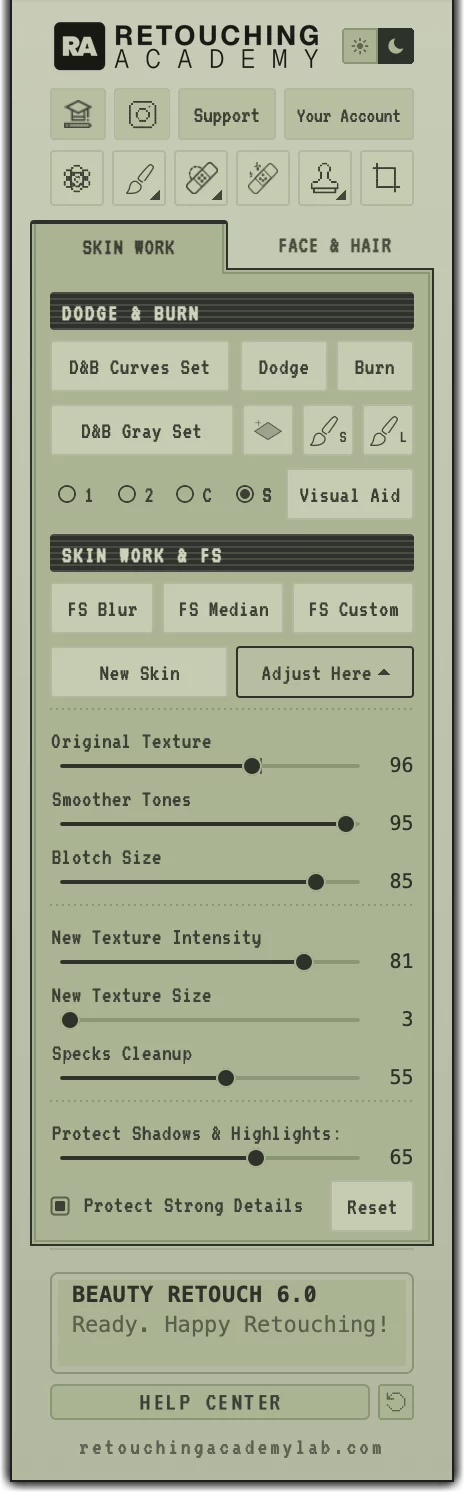
From Top to Bottom of the Panel
Beauty Retouch 6.0 Interface
New look, Light/Dark UI toggle, new tools, auto-selections, built-in RA Beauty Brushes, and a Live Help Screen. Same panel, modernized and ready for 2027.
Click on the sections of the panel below to read about them; each numbered section maps to a group of buttons.
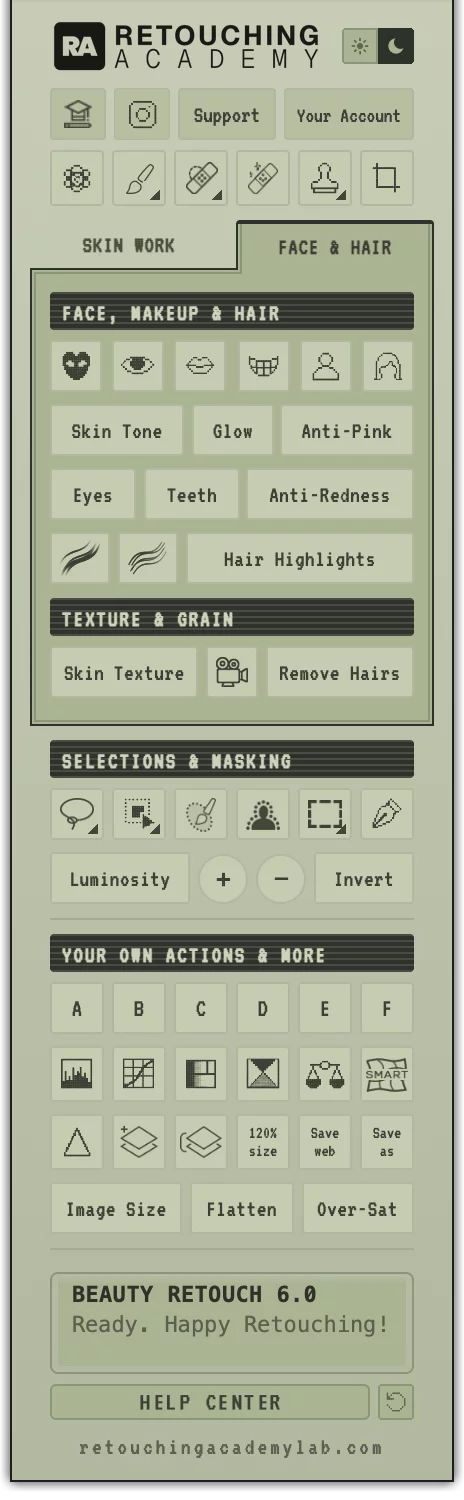
Beauty Retouch 6.0 features many new tools and rebuilt scripts. To keep the panel compact, we’ve put them on two tabs: Skin Work holds Dodge & Burn and Skin Work & FS, and Face & Hair holds Face, Makeup & Hair buttons, as well as the Skin Texture, Film Grain, and Remove Hairs buttons.
Tooltips: each button now has a tooltip pop-up so you can see what the script or tool does. Hover over any button, the tooltip will show up after 1 second.
Where things moved (from the previous version)
- Skin Texture (formerly Add Texture), Film Grain and Remove Hairs buttons are now at the bottom of the Face & Hair tab, in the TEXTURE & GRAIN section.
- Image Size, Flatten Image and Over-Saturation are now at the bottom of YOUR OWN ACTIONS & MORE section.
- Solar Curve: Solar Curve is now the S option in the Visual Aid row on the Skin Work tab.
- D&B Brush S (small) and Brush L (large) are also in the Brush button’s menu in the tools row, listed as D&B - Local 10px and D&B - Global 300px.
// 01 · Top of the Panel
The Top of the Panel
Dark/Light UI options: now you can switch from Sage (light) to Amber (dark) with a toggle in the upper-right corner.
The buttons in the top row are the links to a few useful pages on our website:
- Video Tutorials page;
- RA Panels on Instagram;
- Contact Support page;
- And your Member Account page, with your downloads and license reset.
// 02 · Tools Row
The Tools Row of Buttons
The row of instruments most used in beauty and portrait retouching. Three of its buttons open a dropdown menu for even more tools: click and hold the button, or click the small triangle in its corner, to pick a related tool or brush, as you would in Photoshop’s toolbar.
- RA AI Tool: adds a layer named “Paint over the areas you want to change” at the top of your file and picks the Selection Brush. Paint over what needs to change, then run Generative Fill on that selection, for example to remove or add accessories, hair or wardrobe (learn more in this lesson).
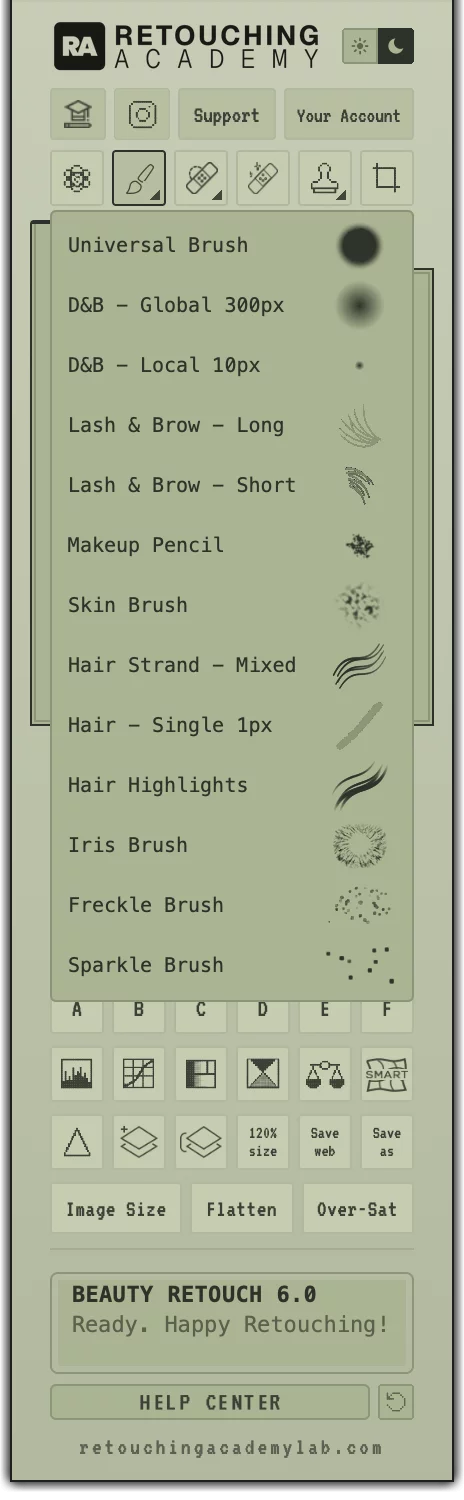
- Brush Tool: RA Beauty Brushes built in: we’ve added new beauty brushes such as the Lash & Brow, Makeup Pencil, Skin, Hair, Iris, Freckle, Sparkle, and Universal brushes, besides the custom D&B and Hair brushes from the earlier versions.
Hold the Brush button in the tools row at the top of the panel, or click the small triangle in its corner, and pick the brush you want from the dropdown.
- Universal Brush

- D&B - Global 300px

- D&B - Local 10px

- Lash & Brow - Long

- Lash & Brow - Short

- Makeup Pencil

- Skin Brush

- Hair Strand - Mixed

- Hair - Single 1px

- Hair Highlights

- Iris Brush

- Freckle Brush

- Sparkle Brush

- Universal Brush
- Spot Healing Brush Tool: the button holds the Spot Healing Brush and the Healing Brush.
- Remove Tool;
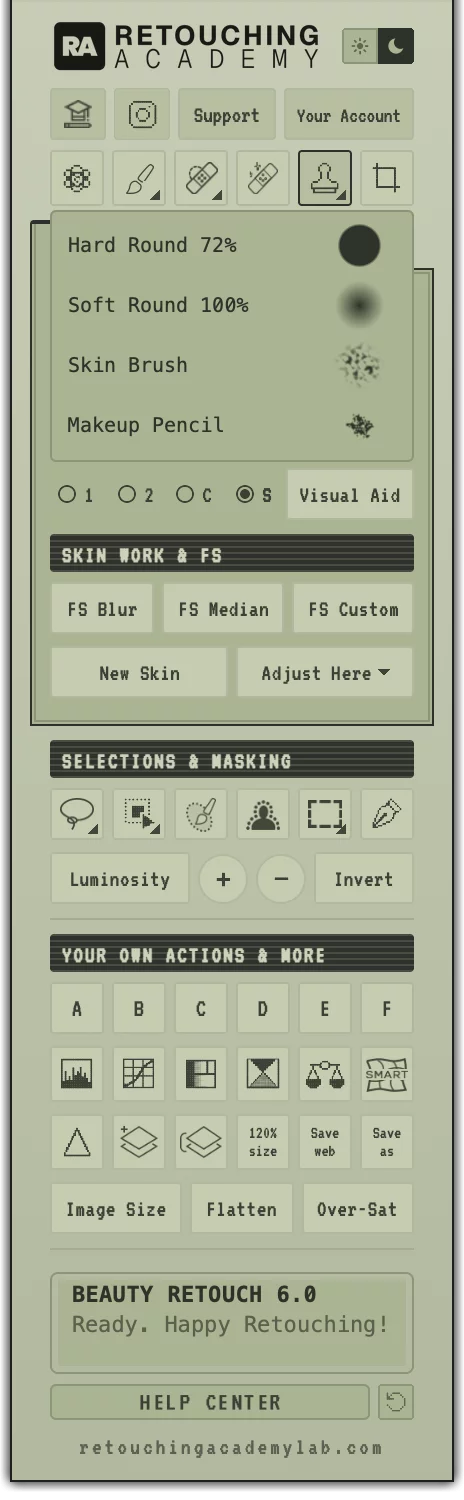
- Clone Stamp Tool: hold the button, or click the small triangle in its corner, to clone with a Hard Round 72% or Soft Round 100% tip, or with the Skin Brush or Makeup Pencil tip of the RA Beauty Brushes.
- Hard Round 72%

- Soft Round 100%

- Skin Brush
- Makeup Pencil
- Hard Round 72%
- Crop Tool.
// 03 · Dodge & Burn
Dodge & Burn Section
Dodge & Burn is one of the key beauty and portrait retouching techniques. This section sets up the layers for several variations of the technique, from a Curves set to 50% gray layers. Our Professional Skin Retouching and Master Dodge & Burn Technique video courses are a great source if you are still learning.
The buttons in the upper row of this section set up:
- D&B Curves Set: the full Curves D&B set up with the Visual Aid layer group at the top;
- Dodge: just a Dodge Curve, masked;
- Burn: just a Burn Curve, masked;
The second row:
- D&B Gray Set: a set of D&B Gray Layers for your Dodging & Burning work on separate layers;
- D&B 50% Gray Layer (the gray diamond): just one Gray Layer for D&B work on the same layer (our preferred way of D&B);
- D&B Brush S and L: the small custom D&B Brush (10px) and the large one (300px), also in the Brush button’s menu as D&B - Local 10px and D&B - Global 300px.
The Visual Aid row:
Visual Aid: pick the version you need with the small round buttons next to it, then press Visual Aid to set it up. (1): black & white for D&B. (2): the same, with more contrast. (C): Color Check. (S): Solar Curve, to check a studio background for sensor spots and retouching footprints. Your pick stays set; change it when you need a different Visual Aid.
Learn more in the Dodge & Burn Scripts lesson of the BR training.
// 04 · Skin Work & FS
Skin Work & Frequency Separation (FS)
The Frequency Separation technique is a great time-saver, but you must know how to use it correctly to produce professional, high-quality retouching results when using it. Our Professional Skin Retouching and Professional High-End Beauty Retouching video courses are a great source if you are still learning. The All-in-One Beauty Retouch bundle includes both those courses and more.
The Skin Work & Frequency Separation (FS) buttons in the top row of this section are:
- FS Blur: the Frequency Separation (FS) setup via the Gaussian Blur filter;
- FS Median: the Frequency Separation (FS) setup via the Median Filter;
- FS Custom: the custom FS setup via High Pass and Gaussian Blur filters; you set the High Pass radius once.
The second row:
- New Skin and Adjust Here: Run New Skin, paint white on the group’s black mask over the skin you want to improve, then press Adjust Here to open the sliders and match the tone smoothing, blotch size, texture and specks cleanup to the image at hand.
Smoother Tones, Blotch Size, the two New Texture sliders and Specks Cleanup start from values matched to the size of the face in your image.
The Adjust Here sliders, in the order on the card:
- Original Texture: Soften or boost original skin texture. 100 mark: as shot.
- Smoother Tones: Set intensity to even out blotchiness on skin.
- Blotch Size: Set the size of blotches to be affected.
- New Texture Intensity: Add even, new texture where the original is lost or patchy.
- New Texture Size: Size of the new texture: 0 = fine, 100 = coarse.
- Specks Cleanup: Remove small spots and specks. Turn on Protect Strong Details to keep pronounced moles, freckles, etc.
- Protect Shadows & Highlights: Protects the deepest shadows and brightest highlights to preserve realism.
- Protect Strong Details: Protect strong, contrasty marks (moles, beauty marks)
- Reset: Sets every slider back to its default.
Learn more in the Frequency Separation Scripts lesson of the BR training.
// 05 · Face, Makeup & Hair
Face, Makeup & Hair Retouching
The nuanced work that needs your eye. Skin Tone, Glow, Anti-Pink, Eyes, Teeth, and Hair Highlights arrive masked, ready for you to tune them up.
The first row selects:
- Auto Skin Mask (the first button): this script creates a group masking the skin on the face, with the eyes and mouth excluded. Adjust the mask to your image and use this layer group for color corrections or anything you want to be constrained to the face only.
- Selection buttons: select Eyes, Lips, Teeth, Face and Upper Body, and Hair. These buttons select the named parts for everyone in the frame.
Shift-click to add to the selection, Opt-click (Alt-click) to subtract from it.
The automatic masks and Select People buttons need Photoshop® 2026 (v27.9) or later.
The Face, Makeup & Hair Retouching buttons:
- Skin Tone (former Magical Skin Tone) to correct and unify skin tones across an image;
- Glow button (former Glowing Skin) to enhance existing highlights on the skin;
- Anti-Pink button to minimize magentas in the skin tone, which is responsible for a less attractive appearance of the skin that might be intuitively connected with unhealthy inflammation;
Skin Tone, Glow and Anti-Pink: masked to the skin of the face, upper body, and hands, with the eyes, lips, and teeth left out.
- Eyes button (former Magic Eyes) to quickly clean up the eye whites and add vitality to the eyes;
Eyes: the eye whites layer is masked to the whites, and the eye color layer to the irises.
- Teeth button (former Magic Smile) to brighten and whiten teeth; masked to the teeth.
- Anti-Redness button (the Green Color Corrector from the MUA Retouch panel) to remove redness in inflamed areas (rash, flared-up pimples, etc.);
- Hair Brush 1 and 2 (the two stroke icons): pick the Hair Highlights and Hair Strand - Mixed brushes of the RA Beauty Brushes;
- Hair Highlights script with two custom brushes to add beautiful highlights for a healthy and attractive hair appearance. Hair Highlights: masked to the hair.
Your own selection first: make a selection before you click, and Teeth, Skin Tone, Glow, Anti-Pink and Hair Highlights use it as their mask instead.
Learn more in the Face, Makeup & Hair Retouching lesson.
// 06 · Texture & Grain
Texture & Grain
- Skin Texture (formerly Add Texture): restores or imitates skin texture in areas that look too smooth or lack detail; paint it in where needed.
Skin Texture is fully editable: its filters are Smart Filters, so double-click one in the Layers panel to change the grain amount, size, or relief for the image at hand.
- Film Grain: adds an editable Grain adjustment layer over the whole frame. This is a different type of texture and should not be used in place of the synthetic Skin Texture script.
- Remove Hairs (former Remove Body & Facial Hair): works great for facial hairs or stubble under the brows. It is also very handy for cleaning up black spots or makeup specks on skin, hair-spray particles in hair, lint on clothing, and other small distractions that would otherwise take forever to remove one by one.
Learn more in the Frequency Separation Scripts lesson of the BR training.
// 07 · Selections & Masking
Selections & Masking
Precise selections and masks are essential in professional retouching, whether you’re isolating details, refining edges, or applying targeted adjustments. The top row holds Photoshop’s selection tools; the row under it is our Luminosity Masking set.
- The Lasso Tool;
- Object Selection Tool;
- Selection Brush;
- Select Subject feature;
- Rectangular Marquee Tool;
- Pen Tool.
Hold the Lasso, Object Selection, or Marquee button, or click the small triangle in its corner, to pick a related tool: Lasso adds Polygonal and Magnetic Lasso, Object Selection adds Quick Selection and Magic Wand, and Marquee adds Elliptical Marquee.
Our very own Luminosity Masking set, the color grading “secret weapon” for our power users. Option-click (Alt-click on Windows) Levels or Curves to tighten a luminosity mask right from the panel.
- Luminosity selection button (former Basic);
- Plus button to expand the Luminosity-based selection;
- Minus button to subtract from the Luminosity-based selection;
- Invert button to invert the active selection. The Invert button works independently of the other buttons in this section; it will invert any selections regardless of which tools you used to make them.
Learn more in the Selections & Masking Tools lesson of the BR training.
Learn more in the Luminosity Masking Set lesson of the BR training.
// 08 · Your Own Actions & More
Your Own Actions & More
Six buttons for your own actions, then adjustment layers, finishing and export tools in the three rows below them.
A to F
Add your own custom Actions and trigger them right from the panel’s interface.
Each button plays the action named with its letter, A to F, from any action set. If an action has no steps yet, a pop-up links to the instructions for recording it.
Learn more in the User Custom Actions lesson.
The row under A to F adds these Adjustment Layers:
- Levels
- Curves
- Hue/Saturation
- Selective Color
- Color Balance
Levels and Curves: a click on either of those buttons adds an adjustment layer, as before. Option-click (Alt-click on Windows) applies Levels or Curves directly to the active layer or layer mask, with the dialog open.
- Smart Liquify: the Liquify Filter added as a Smart Object so you can re-adjust your manipulations as many times as you need, unlike when using the regular Liquify Filter.
The next row:
- Sharpen the entire image or isolated parts. Sharpen: an active selection becomes the Sharpen layer’s mask.
- Add a Blank Layer;
- Stamp All Visible Layers;
- 120% size: increases the image size to 120%, for gradual enlargement in steps;
- Save web: opens the Save for Web dialog box;
- Save as: opens the Save a Copy dialog box.
The last row:
- Image Size: the Image Size dialog is useful in many situations, and having quick access to it directly on the panel is a real time-saver; it opens set to Preserve Details 2.0.
- Flatten Image: our go-to before exporting TIFF files for clients, as it removes all unnecessary layer and masking data from the file;
- Over-Sat: the Over-Saturation check builds a Visual Aid that shows the oversaturated areas of your image, with a Desaturate Here layer to correct them, before final delivery to a client or printing.
Learn more in the Quality Control lesson.
Learn more in the Bottom Section of the Panel lesson.
// 09 · Live Help Screen & Help Center
Live Help Screen & Help Center
Live Help Screen: when a script can’t run, the screen on the panel shows what happened, with an RA error code and a link to its troubleshooting page.
Live updates on the Screen: it works like a pager. When a new version of the panel is ready in your Member Account, or we have news for you, such as a new video tutorial, the Screen shows it when you open the panel, with a button that takes you there. Close it with the ✕ so you can see the script status messages while you work.
HELP CENTER opens our FAQ page. When the Screen shows an error or a message, the button takes you to its page instead.
Pop-ups have a “Don’t show again” box. To bring hidden pop-ups back, click the backward arrow button next to HELP CENTER, under the Screen. It appears once you’ve turned a pop-up off.
Every code is explained on the Panel Error Codes page.
Proceed to the next topic to learn how to use each button and script of the panel.